Best Blogger Tips
Showing posts with label DIY. Show all posts

Tuesday, 1 March 2011

Tuesday Ten
{10 new Photoshop brushes}


New Photoshop Brush Set to celebrate by Blog Anniversary
Happy 3rd Anniversary Slightly Off-Center!
Textures & Butterfly


The last sets of brushes I posted so far have 1390 downloads... Wow!

Check back later this week for my Blogaversary Giveaway


Image and video hosting by TinyPic Follow my blog with bloglovin

Thursday, 9 December 2010

The Icing On The Cake

I've been taking a cake decorating class at my local Michaels Craft store. It's been so much fun but the Cake Boss has nothing to worry about. It will be quite a while before I will be able to learn those fancy flowers and lovely cup cakes I oh so admire on those cake decorating shows on TV (if ever). But I'm have fun anyway and that is all that matters -- right?

The photo collage above are photos taken from our class last night. My cake is the one in the middle and bottom left.

Friday, 3 December 2010

Technology & Miracles

{Screen shot I took from SIL session}

Last night I got to log on to view my SIL's ultrasound session for baby #2.  It blows my mind how advanced technology has gotten since I had my kids.  I wasn't even allowed to have hubby in the room with me when I had an ultrasound for my first two kids.

Last night we were able to watch and listen to everything going on, and if we wanted, we could interact via web cam or chat with the other people logged on as guests.  Too cool!

SIL's last baby was born three years ago and hubby and myself with the aid of my dad, made baby Ella a cradle.  We dressed it with the cutest bedding and the cuddliest blankets - it looked amazing!

 {see post:  The Cradle Will Rock 2}

I am looking for something equally nice to give to SIL and baby #2, but I am having a hard time coming up with ideas.  Maybe you have some?  If you have any ideas for a gift for my new Niece, leave a message with your idea.  We have until mid February to come up with something; who knows, there may be a little surprise gift for the person with the best suggestion.
Image and video hosting by TinyPic

Thursday, 2 December 2010

What have I been up to?

Hello Darlings,

How have you all been? I've been busier than a beaver in a coffee lake. This week I have been doing some heavy duty cleaning and preparing my house for the holiday season. I can't wait to get all my decoration up inside the house as well as finish putting up the lights on the outside of the house. I am also taking a cake decorating course, so that is keeping me on my toes too. I can't wait to actually decorate a cake though, instead of practicing flowers and swirls on parchment.


I have another thing I wanted to share.  I have two new (to me) cameras that I am oh so excited about.  The first one is a Polaroid 215 Land camera made circa 1966.  The other is a Ricohflex VI, circa 1950's.  I think I will wait until after the new year to load the Richo with some film.  120 film is getting more and more expensive to buy here and there isn't a camera shop in this city (that I know of) that still will develop 120 film locally -- it gets a little expensive to sending the film out to be developed.  Perhaps I will look into taking a film developing course after I fishing with the cake decorating.  I did however order some Fuji pack film for the Polaroid and it should be arriving any day now (I love Amazon).  If you have any suggestions for using either camera, I would so appreciate your input and expertise!

I will be back soon, hopefully with some photos from the new Polaroid and my first cake photos.  Until then have a great week and weekend!
Image and video hosting by TinyPic

Wednesday, 24 November 2010

Mix 'N Match Craft Challenge

I am participating in a craft challenge/contest over at The Perfect Pear. For the first challenge our three items we had to use were: Yarn, Paperclip, Glitter.

I made a Pom Pom Bookmark

 Head on over to The Perfect Pear to check out all the other creative entries. 

Image and video hosting by TinyPic

Ps. Don't forget to enter the  
Birthday Give-Away
Winner will be picked on Friday November 26, 2010.

Friday, 5 March 2010

Whoopie! Pies + Friday Fill-Ins

Whoopie Pies
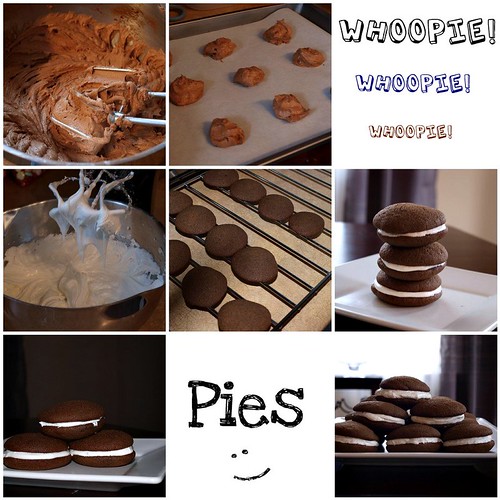
I made a delicious batch of Whoopie Pies this week and they are going fast.  What is a Whoopie Pie you ask?  Well, it is a sinful confection made with two round(ish) chocolate, pumpkin or banana cake mounds, with a gooey, creamy frosting that is sandwiched between the cake.  A whoopie pie, also called: a gob, black-and-white, bob, or "BFO" for Big Fat Oreo.

Recipe:
Ingredients
  • 2  cups  all-purpose flour
  • 1/2  cup  unsweetened cocoa
  • 1 1/2  teaspoons  baking soda
  • 1/2  teaspoon  salt
  • 1  stick unsalted butter, softened (1/2 c)
  • 1  cup  sugar
  • 1  large egg
  • 1  cup  milk
Preparation:

Preheat oven to 425°F. Line 2 large baking sheets with parchment paper.
Make cakes: Sift flour, unsweetened cocoa, baking soda and salt together into a bowl. Cream butter and sugar in a large bowl of an electric mixer at high speed until fluffy, about 5 minutes. Add egg and beat at medium speed until fully incorporated. Change mixer speed to low and add dry ingredients, alternating with milk, mixing until just blended.
Drop batter 1/2 Tbsp. at a time and about 2 inches apart onto each sheet to make 18 cakes per baking sheet. Bake for 7 minutes, until mini cakes are springy to touch. Let cool on pan for 5 minutes, and then transfer to racks to cool completely. Change parchment paper and repeat to make 72 cakes.
Match cakes in pairs so tops and bottoms are similar in shape. Spread bottoms with cream filling and cover with top.
For Cream Filling, combine 1 stick of unsalted butter and 1 2/3 cups confectioners' sugar in a bowl and beat at low speed until blended. Then beat at high speed until mixture is fluffy, about 5 minutes. Add 1/2 tsp. pure vanilla extract and 2 cups marshmallow cream; mix at low speed until blended well. (Makes 2 1/3 cups)

Note:  If you want to take the time to add the filling to a pastry bag and pipe the batter onto your parchment lined baking sheet, the cookies/cakes will come out in a more rounded shape.

Now on to the Fill-Ins.
Want to play along? Click on the button.

#166.  And...here we go!
 
1. Why are you making a mountain out of molehill?
2. I want you to take mother nature and give her a good hard shake for me today (brrrr!).
3. I'm learning to take control of anxieties and fears, then it will be on my terms.
4. Shake it up and see what happens.
5. I could use a record button for my mind these days.
6. I was feeling pretty confident about my outfit choice and then I caught a glimpse of my reflection in the window (Yikes!).
7. And as for the weekend, tonight I'm looking forward to going with the flow, tomorrow my plans include the usual Saturday errands, then spending the evening baking for a wedding shower for my sister-in-law and Sunday, I want to enjoy a nice brunch with the ladies!

Tuesday, 10 November 2009

Bonding Moments (craft night)

Saturday night bonding time with my two girls... lucky me!

This is what we made:


Instruction for DIY Coasters

Ps.  This was my oldest daughters idea.  She called on Friday night to ask if we could spend Saturday evening together making a craft.  love Love LOVE ♥

Saturday, 24 October 2009

What Am I Craving?

Rolo Pretzel Turtles
Salty pretzel, topped with a gooey chocolate and caramel with a crunchy pecan on top.

What you will need:
Rolo
Mini pretzels
Nuts – toasted pecans (any nut will do)

Preheat your oven to 350
  1. Unwrap your Rolos. Place pretzels on baking sheet. Top with a Rolo.

  2. Bake in oven for 3-5 minutes, just until the chocolate starts to melt. The Rolo should be soft but not completely melted.

  3. Remove from oven and place on cooling rack. Gently push the nut down into the melted Rolo.
These little treats are totally addictive. My girls and I devoured an entire tray in a matter of minutes.
*please proceed with caution*

I made these little treat boxes for the turtle treats. So cute!


Download the PDF file:
Blue, Green, Yellow, Red

Wednesday, 9 September 2009

DIY Jar Labels

I'm still looking for ways to personalize the new pad, so this week I came up with this idea to design and print labels for jars that I purchased for my bathroom cabinet. They remind me of the jars I remember seeing in the pharmacy and doctor office when I was a wee girl.

I loved them so much that I want to share them with you. I have included these labels and a blank template for you to download and use on your own jars.

Directions:
Download and print labels onto card stock -I used a metallic white cardstock. Cut and past ( I used double sided craft tape) onto glass jars or decorative bottles or vases. Jars and glossy cardstock are from Michaels craft store.
Download Bath Apothecary Labels
Download the Blank Label template


Monday, 29 June 2009

When You Wish Upon A Jar

“I believe in wishes and in a person's ability to make a wish come true, I really do. And a wish is more than a wish... it's a goal that your conscience and sub conscience can help make reality.” ~ Michael Jackson
{click photo for full view}

I had two of my nieces with me for the day on Friday, so I decided a craft would be a great distraction on such a dreary day. I had just purchased a bunch of glitter, tags, ribbon and other craft supplies earlier in the week so I had everything that we needed to make our Wish/Dream Jars. I think they both did an exceptional job.

The youngest wanted her jar to be a "Dream Jar" and her sister wanted to keep all her special wishes inside hers. We were all covered in glue and glitter by the end of the afternoon and I had a huge mess to clean up, but it was all so worth it seeing their finished project and seeing the joy on both their faces.

I got the idea after reading an interview with Artist and author Keri Smith who also writes the blog The Wish Jar.

Make your own Wish/Dream/Inspiration Jar:

Mason Jar, clear glass canister, coffee can...
Double sided tape
Craft glue
Glue gun (glitter glue sticks)
Glitter
Ribbon
Dried/Silk flowers
Butterflies
Labels
Glass beads
Wire
Shells
Sand
Feathers
Found objects
*Dreams, Wishes and/or Desires
Have fun!

Tuesday, 3 June 2008

Moon River from Breakfast at Tiffany's

I was making some Photoshop brushes of Audrey Hepburn for Miss Priss when this song came to mind. This is one of my favorite scenes from Breakfast at Tiffany's, enjoy!


Here you can download the Audrey Photoshop brushes


Saturday, 12 April 2008

The Cradle Will Rock (part 2)

...................Finally! Baby L's cradle is finished!....................

Few! Finished the cradle a day late but I couldn't be happier with the end result. Made a minor change with the colour of the cradle, and I decided to go with the sage bedding instead of pink.


Baby L look so beautiful in her new bed!  A special thanks goes out to my Dad who is a master at his craft. Thanks Daddy!

Tuesday, 8 April 2008

The Cradle Will Rock


Update: Thursday, April 10


I've decided to keep all the cradle and baby L updates all on the same post. It could take me a few days to finish the cradle, seems the weather is going to be crap today and I will be unable to varathane it until Friday.

Ella did finally make a grand entrance into the world yesterday evening, weighing 7lbs 15 oz. Mommy, Daddy and Baby L are all doing fine.

Update: Wednesday, April 9


Started staining the cradle and as it turns out, just on time. We received word this morning that Mommy-to-be is in the hospital and baby L is due to make her grand entrance later this afternoon or early evening.


Hope she loves the cradle!


Fit for a Princess:


The cradle I had made for the newest member of our family, Niece #4 - Baby Ella. Baby L hasn't arrived yet but we are expecting her any day now. I was just visiting with mommy-to-be last night and she's very anxious and excited. Her doctor is saying baby is going to be around 10 lbs give or take - now that's a good size baby!


Thank you to my Dad who was able to construct the cradle in under a week. Everything is all finished except for the stain and varnish and I'm hoping I will be able to get started on that this afternoon. Can't wait to see the finished product with all the pink ruffly bedding.